Surprise! Intel's 3DXPoint memory will go inside a DDR4 slot—but not everyone is happy with Intel's proprietary approach to support.
INTEL / MICRON
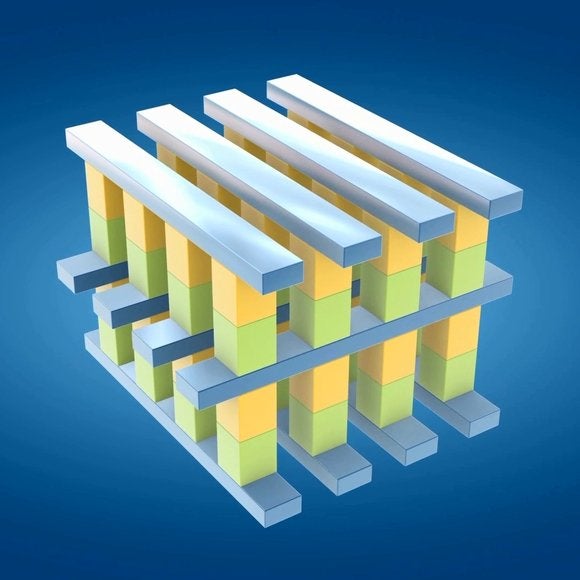
It was clear from the beginning that Intel and Micron’s new 3D XPoint memory—which promises “1,000 times” the performance of today’s SSDs—would require a faster pathway into the PC.
After all, SATA, SATA Express, and even PCIe lack the sheer bandwidth to support the levels at which 3D XPoint can perform. But this week Intel officially revealed its plans for 3D XPoint memory support: It will slip into a DDR4 slot, and it’s a decision that won’t make vendors happy.
The story behind the story: When Intel and Micron introduced its jointly built memory, everything seemed rosy. But now that details of how it will be implemented are starting to trickle out, the devil’s hand is becoming apparent.
Intel’s 3D XPoint-based DIMMs are electrically and physically compatible with DDR4, and offer a four-fold increase in capacity. Intel also says the memory offers massive performance benefits without modifications to your OS or applications.
Intel will offer 3D XPoint memory that actually slip into DDR4 slots.
So if all that sounds good, why the grousing? The problem, it seems, is how Intel is rolling out support. While the 3D XPoint DIMM is electronically compatible and pin-compatible with DDR4, Intel’s compatibility solution is proprietary.
Rick Merritt of EETimes first chronicled the unhappy reactions to Intel’s news here. Merritt points out that despite Intel’s claim of being electrically compatible, company officials conceded an entirely new CPU and new extensions will be required to access 3D XPoint.
“They’re extending the (DDR4) interface,” Jim McGregor, an analyst with Tirias Research, told PCWorld in an interview. “It’s going to be electrically and pin compatible, but the way they talk will be different.”
With the only source of the new type of memory coming from a fab jointly owned by Micron and Intel, no one’s going to be happy, McGregor said. ”If you don’t have multi-vendor support, the OEMs are going to backlash,” he said.
McGregor compared the 3D XPoint situation to what happened with Direct RDRAM: Intel tried to push a new memory type and received incredible pushback from memory makers. In that battle, Intel and Rambus created a new type of high-speed, serial memory that no one wanted. The outcry gave Intel a bloody nose, and the company actually had to do a 180-degree turn, dumping RDRAM and embracing the standard that ultimately won: DDR.
McGregor also said memory makers are vexed by a lack of transparency.
”The main frustration is [Intel and Micron] won’t tell us anything about the damned stuff,” he said.
TIRIAS RESEARCH
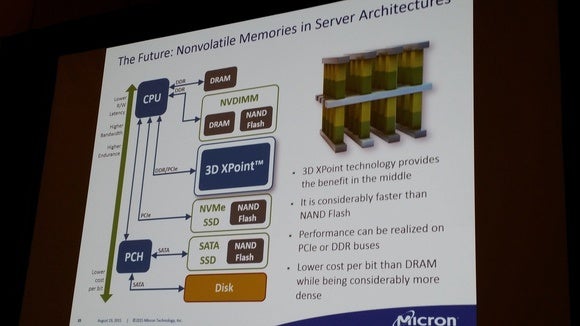
This Micron slide from IDF seems to show 3D XPoint being used quite differently than Intel’s plan.
McGregor said both Micron and Intel were reluctant to answer questions with the other party in the room—an awkward dynamic considering they’re partnering. Nonetheless, it’s worth noting that Micron’s plan for what it does with 3D XPoint differs from Intel’s.
For example, check out the slide above, from Micron’s presentation at IDF. It shows 3D XPoint living on the PCIe bus and actually below the industry JEDEC standard that wasannounced in May. That standard, called NVDIMM, sounds conceptually closer to what Intel is planning, but the two don’t appear to be compatible from what we know today. JEDEC officials were unavailable to comment.
As a DRAM manufacturer, Micron officials also insist DRAM will be relevant with 3D XPoint, McGregor said. But that doesn’t square with Intel’s statements. The company has said from the beginning that some PC configurations that don’t need the performance of DRAM can use just 3D XPoint. I covered what that world might look likehere.
All these concerns, of course, will emerge further down the road. In the near term, we’ll see 3D XPoint-based SSDs that plug into SATA, SATA Express and PCIe slots. It will be a while before 3D XPoint becomes main system memory, and Intel won’t actually ship its 3D XPoint DIMM Xeon until 2017 at the earliest. So even if there are complaints from the industry, it won’t matter any time soon. Furthermore, 3D XPoint benefits might silence critics anyhow. Intel said in one scenario, 3D XPoint systems could come stoked with a 6TB—yes, terabyte—DIMM inside.
That’ll mainly appeal to people running servers and data centers, but Intel has said since the beginning that it will also target 3D XPoint at enthusiasts and gamers (it already pushes rebranded and neutered Xeons into that crowd). So as much as it seems that 3D XPoint is currently a fantasy technology, and we shouldn’t worry about proprietary approaches to compatibility, it will eventually land in a machine for you.
Each update is a black box, and it's going to stay that way.
Microsoft has now released three cumulative updates for Windows 10. These updates combine security fixes with non-security bug fixes, and so far, Microsoft hasn't done a very good job of describing the contents of these cumulative updates. While the security content is quite fully described, explanations of the non-security fixes have been lacking.
Many, including your author, feel that this is undesirable and that a key part of the Windows-as-a-Service concept, in which Microsoft releases a steady stream of fixes and functional improvements, is a clear explanation of what those updates are. This is a new approach for Microsoft, and it seems like reassuring users and administrators that issues are getting fixed—and that functional changes are clearly described—should be important.
This is doubly important in those unfortunate situations that a patch has a problem. Microsoft will tend to update such patches when the problems have been fixed, but it does a poor job of clearly communicating this.
Unfortunately, it does not seem that the company intends to change this approach. Company representatives told The Register that while the company "may choose" to perform "additional promotion" of new features depending on their "significance," there's no intention of providing full release notes. This means that future patches are going to continue to say nothing more than "This update includes improvements to enhance the functionality of Windows 10."
Microsoft is not unique in the lack of detail in its updates; as app store aficionados will know, software developers show great variation in the quality of their release notes. Some clearly describe the fixes and features that a point release update includes; others offer no more than a terse "Various bug fixes" or similar. But if it is to make Windows 10 appeal even to conservative administrators, we cannot help but feel that more information would be much more valuable than less.
Mozilla is beginning to make a series of changes to Firefox that'll make certain aspects of the browser operate a lot more like Chrome. The changes are broadly designed to make Firefox more secure and stable, but they also have the downside of making it less customizable and potentially more of a resource hog.
"DEVELOPERS WHO ALREADY SUPPORT CHROME EXTENSIONS WILL BENEFIT."
There are a few key changes that Mozilla is making to get there. The first is that it's changing how extensions (which Firefox calls "add-ons") connect to the browser. Mozilla is beginning to require that they use a new method that's very similar to what's used by Chrome and Opera. While that means Firefox extensions may need to be rebuilt, it'll mean that Chrome and Opera extensions should be able to add Firefox support with minimal changes. "Developers who already support Chrome extensions will benefit since they will have one codebase to support instead of two," Mozilla writes in a blog post.
Mozilla is also beginning to require that all extensions go through a security check before they can be installed (currently, only extensions that are submitted to Mozilla's official add-ons gallery go through these checks). While there will be some way to get around this — mostly for developers — this means that every extension that the average person installs will have to pass through Mozilla. For the most part, that's going to be a good thing. "Extensions that change the homepage and search settings without user consent have become very common, just like extensions that inject advertisements into web pages or even inject malicious scripts into social media sites," Mozilla wrote earlier this year. There are obviously some huge security issues in letting extensions run through a web browser unchecked, and Mozilla is beginning to change that.
MOZILLA IS TRYING TO MAKE FIREFOX MORE STABLE AND SECURE
The other updates relate to changing technologies inside of Firefox itself. For one, Firefox's behind-the-scenes tab management is soon going to work a lot more like the way Chrome handles tabs. Rather than running the browser and web content all together, Chrome splits them up so that the browser frame is separate from each individual browsing tab. It means that if one tab crashes, everything else can keep moving just fine, rather than the entire browser going down with it. There are also some security enhancements that come with tabs being kept independent of each other. This is essentially the model that Firefox is moving over to. At first, Mozilla will simply be separating the browser and the web content into two items, but over time it sounds like the plan is to break apart each tab. That might lead to some of the resource issues that Chrome has, but there's a good argument to be made that it's a fair trade-off for stability and security.
Finally, Mozilla is changing some of the underlying technology that it uses to build Firefox. That result is that extension developers aren't going to be able to alter the browser in quite as deep of a way. That's going to be a disappointment for some, but it's certainly not a reason for immediate outrage: Firefox has long been far more customizable than other browsers, but it was customizable in a way that could pose security and stability issues. Currently, "add-ons have complete access to Firefox’s internal implementation" of core technologies, Mozilla writes. That's apparently also led to development slow downs, which Mozilla hopes to avoid by changing what extensions are capable of.
These changes are going to be rolling out over the next year or so, with some starting much sooner. Extensions are going to have to be approved starting with Firefox 42, which comes two versions from now. Firefox 43 is supposed to begin separating the browser itself from the content inside its tabs; the deeper changes will come about around 12 to 18 months from now. It's likely that that's when developers will have to switch over to the new method of making extensions.
Deep Learning is very computationally intensive, so you will need a fast CPU with many cores, right? Or is it maybe wasteful to buy a fast CPU? One of the worst things you can do when building a deep learning system is to waste money on hardware that is unnecessary. Here I will guide you step by step through the hardware you will need for a cheap high performance system.
In my work on parallelizing deep learning I built a GPU cluster for which I needed to make careful hardware selections. Despite careful research and reasoning I made my fair share of mistakes when I selected the hardware parts which often became clear to me when I used the cluster in practice. Here I want to share what I have learned so you will not step into the same traps as I did.
GPU
This blog post assumes that you will use a GPU for deep learning. If you are building or upgrading your system for deep learning, it is not sensible to leave out the GPU. The GPU is just the heart of deep learning applications – the improvement in processing speed is just too huge too ignore.
I talked at length about GPU choice in my previous blog post, and the choice of your GPU is probably the most critical choice for your deep learning system. Generally, I recommend a GTX 680 from eBay if you lack money, a GTX Titan X (if you have the money; for convolution) or GTX 980 (very cost effective; a bit limited for very large convolutional nets) for the best current GPUs, a GTX Titan from eBay if you need cheap memory. I supported the GTX 580 before, but due to new updates to the cuDNN library which increase the speed of convolution dramatically, all GPUs that do not support cuDNN have become obsolete — the GTX 580 is such a GPU. If you do not use convolutional nets at all however, the GTX 580 is still a solid choice.
Suspect line-up Can you identify the hardware part which is at fault for bad performance? One of these GPUs? Or maybe it is the fault of the CPU after all?
CPU
To be able to make a wise choice for the CPU we first need to understand the CPU and how it relates to deep learning. What does the CPU do for deep learning? The CPU does little computation when you run your deep nets on a GPU, but your CPU does still work on these things:
Writing and reading variables in your code
Executing instructions such as function calls
Initiating function calls on your GPU
Creating mini-batches from data
Initiating transfers to the GPU
Needed number of CPU cores
When I train deep neural nets with three different libraries I always see that one CPU thread is at 100% (and sometimes another thread will fluctuate between 0 and 100% for some time). And this immediately tells you that most deep learning libraries – and in fact most software applications in general – just use a single thread. This means that multi-core CPUs are rather useless. If you run multiple GPUs however and use parallelization frameworks like MPI, then you will run multiple programs at once and you will need multiple threads also. You should be fine with one thread per GPU, but two threads per GPU will result in better performance for most deep learning libraries; these libraries run on one core, but sometimes call functions asynchronously for which a second CPU thread will be utilized. Remember that many CPUs can run multiple threads per core (that is true especially for Intel CPUs), so that one core per GPU will often suffice.
CPU and PCI-Express
It’s a trap! Some new Haswell CPUs do not support the full 40 PCIe lanes that older CPUs support – avoid these CPUs if you want to build a system with multiple GPUs. Also make sure that your processor actually supports PCIe 3.0 if you have a motherboard with PCIe 3.0.
CPU cache size
As we shall see later, CPU cache size is rather irrelevant further along the CPU-GPU-pipeline, but I included a short analysis section anyway so that we make sure that every possible bottleneck is considered along this pipeline and so that we can get a thorough understanding of the overall process.
CPU cache is often ignored when people buy a CPU, but generally it is a very important piece in the overall performance puzzle. The CPU cache is very small amount of on chip memory, very close to the CPU, which can be used for high speed calculations and operations. A CPU often has a hierarchy of caches, which stack from small, fast caches (L1, L2), to slow, large caches (L3, L4). As a programmer, you can think of it as a hash table, where every entry is a key-value-pair, and where you can do very fast lookups on a specific key: If the key is found, one can perform fast read and write operations on the value in the cache; if the key is not found (this is called a cache miss), the CPU will need to wait for the RAM to catch up and will then read the value from there – a very slow process. Repeated cache misses result in significant decreases in performance. Efficient CPU caching procedures and architectures are often very critical to CPU performance.
How the CPU determines its caching procedure is a very complex topic, but generally one can assume that variables, instructions, and RAM addresses that are used repeatedly will stay in the cache, while less frequent items do not.
In deep learning, the same memory is read repeatedly for every mini-batch before it is sent to the GPU (the memory is just overwritten), but it depends on the mini-batch size if its memory can be stored in the cache. For a mini-batch size of 128, we have 0.4MB and 1.5 MB for MNIST and CIFAR, respectively, which will fit into most CPU caches; for ImageNet, we have more than 85 MB () for a mini-batch, which is much too large even for the largest cache (L3 caches are limited to a few MB).
Because data sets in general are too large to fit into the cache, new data need to be read from the RAM for each new mini-batch – so there will be a constant need to access the RAM either way.
RAM memory addresses stay in the cache (the CPU can perform fast lookups in the cache which point to the exact location of the data in RAM), but this is only true if your whole data set fits into your RAM, otherwise the memory addresses will change and there will be no speed up from caching (one might be able to prevent that when one uses pinned memory, but as you shall see later, it does not matter anyway).
Other pieces of deep learning code – like variables and function calls – will benefit from the cache, but these are generally few in number and fit easily into the small and fast L1 cache of almost any CPU.
From this reasoning it is sensible to conclude, that CPU cache size should not really matter, and further analysis in the next sections is coherent with this conclusion.
Needed CPU clock rate (frequency)
When people think about fast CPUs they usually first think about the clock rate. 4GHz is better than 3.5GHz, or is it? This is generally true for comparing processors with the same architecture, e.g. “Ivy Bridge”, but it does not compare well between processors. Also it is not always the best measure of performance.
In the case of deep learning there is very little computation to be done by the CPU: Increase a few variables here, evaluate some Boolean expression there, make some function calls on the GPU or within the program – all these depend on the CPU core clock rate.
While this reasoning seems sensible, there is the fact that the CPU has 100% usage when I run deep learning programs, so what is the issue here? I did some CPU core rate underclocking experiments to find out.
CPU underclocking on MNIST and ImageNet: Performance is measured as time taken on 200 epochs MNIST or a quarter epoch on ImageNet with different CPU core clock rates, where the maximum clock rate is taken as a base line for each CPU. For comparison: Upgrading from a GTX 680 to a GTX Titan is about +15% performance; from GTX Titan to GTX 980 another +20% performance; GPU overclocking yields about +5% performance for any GPU
So why is the CPU usage at 100% when the CPU core clock rate is rather irrelevant? The answer might be CPU cache misses: The CPU is constantly busy with accessing the RAM, but at same time the CPU has to wait for the RAM to catch up with its slower clock rate and this might result in a paradoxically busy-with-waiting state. If this is true, then underclocking the CPU core would not result in dramatic decreases in performance – just like the results you see above.
The CPU also performs other operations, like copying data into mini-batches, and preparing data to be copied to the GPU, but these operations depend on the memory clock rate and not the CPU core clock rate. So now we look at the memory.
Needed RAM clock rate
CPU-RAM and other interactions with the RAM are quite complicated. I will here show a simplified version of the process. Lets dive in and dissect this process from CPU RAM to GPU RAM for a more thorough understanding.
The CPU memory clock and RAM are intertwined. The memory clock of your CPU determines the maximum clock rate of your RAM and both pieces are the overall memory bandwidth of your CPU, but usually the RAM itself determines the overall available bandwidth because it can be slower than the CPU memory rate. You can determine the bandwidth like this:
Where the 64, is for a 64-bit CPU architecture. For my processors and RAM modules the bandwidth is 51.2GB/s.
However, the bandwidth is only relevant if you copy large amounts of data. Usually the timings – for example 8-8-8 – on your RAM are more relevant for small pieces of data and determine how long your CPU has to wait for your RAM to catch up. But as I outlined above, almost all data from your deep learning program will either easily fit into the CPU cache, or will be much too large to benefit from caching. This implies that timings will be rather unimportant and that bandwidth might be important.
So how does this relate to deep learning programs? I just said that bandwidth might be important, but this is not so when we look at the next step in the process. The memory bandwidth of your RAM determines how fast a mini-batch can be overwritten and allocated for initiating a GPU transfer, but the next step, CPU-RAM-to-GPU-RAM is the true bottleneck – this step makes use of direct memory access (DMA). As quoted above, the memory bandwidth for my RAM modules are 51.2GB/s, but the DMA bandwidth is only 12GB/s!
The DMA bandwidth relates to the regular bandwidth, but the details are unnecessary and I will just refer you to this Wikipedia entry, in which you can look up the DMA bandwidth for RAM modules (peak transfer limit). But lets have a look at how DMA works.
Direct memory access (DMA)
The CPU with its RAM can only communicate with a GPU through DMA. In the first step, a specific DMA transfer buffer is reserved in both CPU RAM and GPU RAM; in the second step the CPU writes the requested data into the CPU-side DMA buffer; in the third step the reserved buffer is transferred to your GPU RAM without any help of the CPU. Your PCIe bandwidth is 8GB/s (PCIe 2.0) or 15.75GB/s (PCIe 3.0), so you should get a RAM with a good peak transfer limit as determined from above, right?
Not necessarily. Software plays a big role here. If you do some transfers in a clever way, you will get away with cheaper slower memory. Here is how.
Asynchronous mini-batch allocation
Once your GPU finished computation on the current mini-batch, it wants to immediately work on the next mini-batch. You can now of course, initiate a DMA transfer and then wait for the transfer to complete so that your GPU can continue to crunch numbers. But there is a much more efficient way: Prepare the next mini-batch in advance so that your GPU does not have to wait at all. This can be done easily and asynchronously with no degradation in GPU performance.
CUDA Code for asynchronous mini-batch allocation: The first two calls are made when the GPU starts with the current batch; the last two calls are made when the GPU finished with the current batch. The transfer of the data will be completed long before the stream is synchronized in the second step, so there will be no delay for the GPU to begin with the next batch.
An ImageNet 2012 mini-batch of size 128 for Alex Krishevsky’s convolutional net takes 0.35 seconds for a full backprop pass. Can we allocate the next batch in this time?
If we take the batch size to be 128 and the dimensions of the data 244x244x3 that is a total of roughly 0.085 GB (). With an ultra-slow memory we have 6.4 GB/s, or in other terms 75 mini-batches per second! So with asynchronous mini-batch allocation even the slowest RAM will be more than sufficient for deep learning. There is no advantage in buying faster RAM modules if you use asynchronous mini-batch allocation.
This procedure also implies indirectly that the CPU cache is irrelevant. It does not really matter how fast your CPU can overwrite (in the fast cache) and prepare (write the cache to RAM) a mini-batch for a DMA transfer, because the whole transfer will be long completed before your GPU requests the next mini-batch – so a large cache really does not matter much.
So the bottom line is really that the RAM clock rate is irrelevant. Buy what is cheap – end of story.
But how much should you buy?
RAM size
You should have at least the same RAM size as your GPU has. You could work with less RAM, but you might need to transfer data step by step. From my experience however, it is much more comfortable to work with more RAM.
Psychology tells us that concentration is a resource that is depleted over time. RAM is one of the few hardware pieces that allows you to conserve your concentration resource for more difficult programming problems. Rather than spending lots of time on circumnavigating RAM bottlenecks, you can invest your concentration on more pressing matters if you have more RAM. With a lot of RAM you can avoid those bottlenecks, save time and increase productivity on more pressing problems. Especially in Kaggle competitions I found additional RAM very useful for feature engineering. So if you have the money and do a lot of pre-processing then additional RAM might be a good choice.
Hard drive/SSD
A hard drive can be a significant bottleneck in some cases for deep learning. If your data set is large you will typically have some of it on your SSD/hard drive, some of it in your RAM, and two mini-batches in your GPU RAM. To feed the GPU constantly, we need to provide new mini-batches with the same rate as the GPU can go through each of them.
For this to be true we need to use the same idea as asynchronous mini-batch allocation. We need to read files with multiple mini-batches asynchronously – this is really important! If we do not do this asynchronously you will cripple your performance by quite a bit (5-10%) and render your carefully crafted advantages in hardware useless – good deep learning software will run faster on a GTX 680, than bad deep learning software on a GTX 980.
With this in mind, we have in the case of the Alex’s ImageNet convolutional net 0.085GB () every 0.3 seconds, or 290MB/s if we save the data as 32 bit floating data. If we however save it as jpeg data, we can compress it 5-15 fold bringing down the required read bandwidth to about 30MB/s. If we look at hard drive speeds we typically see speeds of 100-150MB/s, so this will be sufficient for data compressed as jpeg. Similarly, one is able to use mp3 or other compression techniques for sound files, but for other data sets that deal with raw 32 bit floating point data it is not possible to compress data so well: We can compress 32 bit floating point data by only 10-15%. So if you have large 32 bit data sets, then you will definitely need a SSD, as hard drives with a speed of 100-150 MB/s will be too slow to keep up with your GPU – so if you work with such data get a SSD, otherwise a hard drive will be fine.
Many people buy a SSD for comfort: Programs start and respond more quickly, and pre-processing with large files is quite a bit faster, but for deep learning it is only required if your input dimensions are high and you cannot compress your data sufficiently.
If you buy a SSD you should get one which is able to hold data sets of sizes you typically work with, with an additional few tens of GBs extra space. It is also a good idea to also get a hard drive to store your unused data sets on.
Power supply unit (PSU)
Generally, you want a PSU that is sufficient to accommodate all your future GPUs. GPUs typically get more energy efficient over time; so while other components will need to be replaced, a PSU should last a long while so a good PSU is a good investment.
You can calculate the required watts by adding up the watt of your CPU and GPUs with an additional 100-300 watts for other components and as a buffer for power spikes.
One important part to be aware of is if the PCIe connectors of your PSU are able to support a 8pin+6pin connector with one cable. I bought one PSU which had 6x PCIe ports, but which was only able to power either a 8pin or 6pin connector, so I could not run 4 GPUs with that PSU.
Another important thing is to buy a PSU with high power efficiency rating – especially if you run many GPUs and will run them for a longer time.
Running a 4 GPU system on full power (1000-1500 watts) to train a convolutional net for two weeks will amount to 300-500 kWh, which in Germany – with rather high power costs of 20 cents per kWh – will amount to 60-100€ ($66-111). If this price is for a hundred per-cent efficiency, then training such a net with a 80% power supply would increase the costs by an additional 18-26€ – ouch! This is much less for a single GPU, but the point still holds – spending a bit more money on an efficient power supply makes good sense.
Cooling
Cooling is important and it can be a significant bottleneck which reduces performance more than poor hardware choices do. You should be fine with a standard heat sink for your CPU, but what for your GPU you will need to make special considerations.
Modern GPUs will increase their speed – and thus power consumption – up to their maximum when they run an algorithm, but as soon as the GPU hits a temperature barrier – often 80 °C – the GPU will decrease the speed so that the temperature threshold is not breached. This enables best performance while keeping your GPU safe from overheating.
However, typical pre-programmed schedules for fan speeds are badly designed for deep learning programs, so that this temperature threshold is reached within seconds after starting a deep learning program. The result is a decreased performance (a few per-cents) which can be significant for multiple GPUs (10-25%) where each GPU heats up the GPUs next to itself.
Since NVIDIA GPUs are first and foremost gaming GPUs, they are optimized for Windows. You can change the fan schedule with a few clicks in Windows, but not so in Linux, and as most deep learning libraries are written for Linux this is a problem.
The easiest and most cost efficient work-around is to flash your GPU with a new BIOS which includes a new, more reasonable fan schedule which keeps your GPU cool and the noise levels at an acceptable threshold (if you use a server, you could crank the fan speed to maximum speed which is otherwise not really bearable on a noise level). You can also overclock your GPU memory with a few MHz (30-50) and this is very safe to do. The software for flashing BIO is a program designed for Windows, but you can use wine to call that program from your Linux/Unix OS.
The other option is to use to set a configuration for your Xorg server (Ubuntu) where you set the option “coolbits”. This works very well for a single GPU, but if you have multiple GPUs where some of them are headless, i.e. they have no monitor attached to them, you have to emulate a monitor which is hard and hacky. I tried it for a long time and had frustrating hours with a live boot CD to recover my graphics settings – I could never get it running properly on headless GPUs.
Another, more costly, and craftier option is to use water cooling. For a single GPU, water cooling will nearly halve your temperatures even under maximum load, so that the temperature threshold is never reached. Even multiple GPUs stay cool which is rather impossible when you cool with air. Another advantage of water cooling is that it operates much more silently, which is a big plus if you run multiple GPUs in an area where other people work. Water cooling will cost you about $100 for each GPU and some additional upfront costs (something like $50). Water cooling will also require some additional effort to assemble your computer, but there are many detailed guides on that and it should only require a few more hours of time in total. Maintenance should not be that complicated or effortful.
From my experience these are the most relevant points. I bought large towers for my deep learning cluster, because they have additional fans for the GPU area, but I found this to be largely irrelevant: About 2-5 °C decrease, not worth the investment and the bulkiness of the cases. The most important part is really the cooling solution directly on your GPU – flash your BIOS, use water cooling, or live with a decrease in performance – these are all reasonable choices in certain situations. Just think about what do you want in your situation and you will be fine.
Motherboard and computer case
Your motherboard should have enough PCIe ports to support the number of GPUs you want to run (usually limited to four GPUs, even if you have more PCIe slots); remember that most GPUs have a width of two PCIe slots, so you will need 7 slots to run 4 GPUs for example. PCIe 2.0 is okay for a single GPU, but PCIe 3.0 is quite cost efficient with respect to cost-performance even for a single GPU; for multiple GPUs always buy PCIe 3.0 boards which will be a boon when you do multi-GPU computing as the PCIe connection will be the bottleneck here.
The motherboard choice is straightforward: Just pick a motherboard that supports the hardware components that you want.
When you select a case, you should make sure that it supports full length GPUs that sit on top of your motherboard. Most cases support full length GPUs, but you should be suspicious if you buy a small case. Check its dimensions and specifications; you can also try a google image search of that model and see if you find pictures with GPUs in them.
Monitors
I first thought it would be silly to write about monitors also, but they make such a huge difference and are so important that I just have to write about them.
The money I spent on my 3 27 inch monitors is probably the best money I have ever spent. Productivity goes up by a lot when using multiple monitors. I feel desperately crippled if I have to work with a single monitor. Do not short-change yourself on this matter. What good is a fast deep learning system if you are not able to operate it in an efficient manner?
Typical monitor layout when I do deep learning: Left: Papers, Google searches, gmail, stackoverflow; middle: Code; right: Output windows, R, folders, systems monitors, GPU monitors, to-do list, and other small applications.
Some words on building a PC
Many people are scared to build computers. The hardware components are expensive and you do not want to do something wrong. But it is really simple as components that do not belong together do not fit together. The motherboard manual is often very specific how to assemble everything and there are tons of guides and step by step videos which guide you through the process if you have no experience.
The great thing about building a computer is, that you know everything that there is to know about building a computer when you did it once, because all computer are built in the very same way – so building a computer will become a life skill that you will be able to apply again and again. So no reason to hold back!
Conclusion / TL;DR
GPU: GTX 680 or GTX 960 (no money); GTX 980 (best performance); GTX Titan (if you need memory); GTX 970 (no convolutional nets)
CPU: Two threads per GPU; full 40 PCIe lanes and correct PCIe spec (same as your motherboard); > 2GHz; cache does not matter;
RAM: Use asynchronous mini-batch allocation; clock rate and timings do not matter; buy at least as much CPU RAM as you have GPU RAM;
Hard drive/SSD: Use asynchronous batch-file reads and compress your data if you have image or sound data; a hard drive will be fine unless you work with 32 bit floating point data sets with large input dimensions
PSU: Add up watts of GPUs + CPU + (100-300) for required power; get high efficiency rating if you use large conv nets; make sure it has enough PCIe connectors (6+8pins) and watts for your (future) GPUs
Cooling: Set coolbits flag in your config if you run a single GPU; otherwise flashing BIOS for increased fan speeds is easiest and cheapest; use water cooling for multiple GPUs and/or when you need to keep down the noise (you work with other people in the same room)
Motherboard: Get PCIe 3.0 and as many slots as you need for your (future) GPUs (one GPU takes two slots; max 4 GPUs per system)
Monitors: If you want to upgrade your system to be more productive, it might make more sense to buy an additional monitor rather than upgrading your GPU
Customer-centric marketing relies on collecting and processing as many relevant events as possible. Customers are everywhere, which means the amount of data is increasing exponentially. The Go language plays a very important role in our data collection technology. Today, FLXone handles 3+ billion requests per day with an in-house developed application.
Our path to achieving this level of performance started with identifying the key challenges of combining marketing and advertising with technology:
Large amounts of data must be collected and processed.
Clients can buy millions of impressions, increasing our load within seconds.
Latency is KEY to real-time advertising and marketing.
In 2013 we decided that Go (version 1.1 back then) looked promising, so we built our first version of the application in less than 5 days with 2 engineers working on it. The features of the Go language, like goroutines and channels, made things really easy to do well at massive concurrency. Reaching thousands of requests per second on a Macbook Pro with minor optimization was very promising.
The application basically does the following: A request comes in with a wide variety of URL parameters, averaging about 1KB in length. The server then parses them, and writes the message into a distributed message queue. Once that’s completed it returns an empty response with javascript content-type to the client.
Growing up
Once our business started growing, we noticed that the latency was becoming increasingly flaky. We have an internal SLA of 100ms per full request. As we grew even bigger this became more and more of an issue. Initially we thought it had something to do with the network connections to the servers, but even though we were generating multiple terabytes of data every day that was not the case.
We then started analyzing the behavior of our Go application. On average the application spent ~ 2ms per request, which was great! It gave us 98 milliseconds to spare for network overhead, SSL handshake, DNS lookups and everything else that makes the internet work.
Unfortunately the standard deviation of the latency was high, about 100 milliseconds. Meeting our SLA became a major gamble. With the “runtime” package of Go we started profiling the entire application and found out that garbage collection was the cause, resulting in 95-percentile latencies of 279 milliseconds…
We decided to rewrite big chunks of the application to generate minimal or no garbage at all. This effectively helped reduce the interval at which garbage collection froze the rest of application to do its cleanup magic. But we were still having issues, so we decided to add more nodes to stay within our SLA. With over 80K requests per second at peak times, even minimal garbage can become a serious issue.
The day has come
Over the past few months there’s been a lot of talk about Go 1.5. The entire compile chain would be rewritten from C to Go, reminding me of the movie Inception. Even better, the garbage collection functionality would be completely redesigned.
Yesterday evening (19 August), the moment had finally arrived. A stable version 1.5 of Go was released, claiming:
The “stop the world” phase of the collector will almost always be under 10 milliseconds and usually much less.
Just a few hours after the release we rebuilt the application with the new version of Go 1.5 and ran our unit and functional tests; they all passed. It seemed too good to be true, so we put some effort in manually verifying the functionality. After a few hours we decided it was safe to release it to a single production node.
We let it run for 12 hours and afterwards started analyzing the new latencies: full request, application latency and last but not least the garbage collector. Below you can see the reduced deviation in latencies as well as a reduction in absolute latency.
Two histograms of the application level latency (the only thing that really matters). X-axis: latency, Y-axis: number of requests. Left: server running Go 1.4 — Right: server running Go 1.5, you can easily see the low variation in latency.
The new version of Go reduces our 95-percentile garbage collector from 279 milliseconds down to just 10 ms. This is a fantastic 96% decrease in garbage collection pause time and also exactly as advertised in the release notes.
Our 95 percentile garbage collection went down by 96%.
We decided to deploy the new version to the rest of our global infrastructure (12 data centers in 7 geographical areas) and saw our average request latency drop by 53%.This means we can now effortlessly meet our 100ms SLA, plus handle a huge increase in requests per node.
Thanks to the dedication and agility of our team, the release of the new version of Go 1.5 has massively improved the performance of our platform over the span of just 24 hours.
About FLXone
Founded in 2012 by a team of marketing and advertising professionals with a deep understanding of scalable technology, FLXone works with leading advertisers, publishers, agencies and trading desks. Innovation is what keeps us ahead of the curve to build a platform that drives marketing effectiveness for you.
Disclaimer: This post does not constitute an endorsement of any Microsoft service, technology or product by Stephen Hawking. The purpose of this post is to discuss Intel’s communication platform for individuals with disabilities and it’s technical details. Pictures are used purely for informational and demonstrational purposes.
I’m typing this sentence with my face. And no, I didn’t somehow smash my face onto a keyboard with laser-like precision. I used Intel’s ACAT, or Assistive Context-Aware Toolkit, an open source platform developed in C# using .NET 4.5 and Visual Studio 2012 at Intel Labs to allow people with disabilities to communicate with ease, even in very constrained situations, like Stephen Hawking’s,
As we all know, the venerable physicist Professor Stephen Hawking is unable to talk as he is afflicted with ALS and thus relies on a computer system to communicate. In 2011, his condition was deteriorating so badly that he could best communicate at a rate of only 2 words per minute. He reached out to Alan Moore at Intel and asked if Intel could come up with new technology to help his plight.
Intel was happy to oblige. For 3 years, Intel Labs worked in close collaboration with Hawking to acutely address his needs and in January of 2014, they announced the first stable release that Hawking would use to replace his decades-old speech system. There was a near instant 10x improvement to all common tasks such as conducting a web search or opening a Word document. Fast-forward a few months and now Intel has open sourced the whole platform to allow researchers and hackers to broaden its use for people with disabilities of all backgrounds.
Exploring ACAT
Intel’s custom PC for Hawking, with the ACAT software in view.
When a friend sent Intel’s announcement to me, I couldn’t help but hunker down and immediately start tinkering with the ACAT software. Contrary to my initial expectations, it was very easy to install and use. It suffices to just run the installer on your PC and within moments, the ACAT suite is fully accessible to you.
The principle in which ACAT operates is very simple. There is essentially only one ‘switch’ and you can trigger a sequence of these switches to do anything. Hawking operates this switch with his cheek. An infrared beam from Hawking’s glasses tracks his cheek and a twitch from it breaks the beam and triggers the switch. With a webcam, we can emulate Hawking’s method of communication as well.
ACAT Vision detecting my face through the webcam and monitoring my cheek twitches.
A portion of the software called ACAT Vision detects your face and monitors your cheek for twitches. When it detects one as shown in the above picture, a switch is triggered. On screen you have the alphabet laid out in columns as well as some editing and navigation options, kind of like a virtual keyboard. There is a yellow box that flashes and alternates between the top and bottom halves of the laid out alphabet and options. You trigger the switch when the yellow cursor box includes the letter or option that you desire to use. Then the box shrinks to the size of a row of letters and goes through each row in the previously selected half and waits for you to twitch your cheek to trigger a switch and select the row. Once the row is selected, the box shrinks to the space of a letter and it goes through each letter in the previously selected row until you twitch to signal the correct letter.
This process is repeated until you have a few letters for the predictive word completion to choose a word for you. After a while of using the system, the world completion will start to understand the context of your phrases and will suggest words based on your previously typed words. For example, when Hawking types ‘t’, it offers to complete the word as ‘the’ and then follows up with a word like ‘black’ and then based on black it will suggest the word ‘hole’.
The ACAT Talk app narrating my cheek twitched sentences, just like the real Hawking!
While the primary intention of ACAT was to allow Hawking to communicate, it does more than just that. It’s actually a comprehensive system that allows Hawking to control the entire operating system. If he selects the ‘M’ character on the bottom right of his menu, he access the menu, from where he can choose to access many options such as the ‘New File’ dialog or the ‘Launch Application’ dialog. From the ‘Launch Application’ dialog he can start a Google search or use Internet Explorer (though Intel should really set him up to use Edge). The principle of navigation is still the same, the yellow box cursor alternates on the visual keyboard and awaits cheek twitches.
The ‘Launch Application’ menu. To select an application to launch, the corresponding number on the keyboard must be selected. For example, to access Notepad, 7 must be selected.
Once a desktop app is selected, a navigation context menu shows up. From there the relevant options appear to support the navigation of the app. For example, once ‘Google’ is selected, an Internet Explorer browser window pops up. The yellow box cursor cycles through the context menu. An option like ‘Search/URL’ can be chosen to then allow the browser bar to be used for searching or accessing URLs.
Well, what are you waiting for? You can try all this out for yourself. Visit the software's Github release page to get the installer. Make sure to check out the user guide, where you can learn advanced navigation techniques like the radial laser scanner, To make a fork and incorporate your own contributions, check out the Github repository. Happy hacking! (or should I say Happy Hawking? )
 INTEL / MICRON
 TIRIAS RESEARCH

 ) for a mini-batch, which is much too large even for the largest cache (L3 caches are limited to a few MB).


 ). With an ultra-slow memory we have 6.4 GB/s, or in other terms 75 mini-batches per second! So with asynchronous mini-batch allocation even the slowest RAM will be more than sufficient for deep learning. There is no advantage in buying faster RAM modules if you use asynchronous mini-batch allocation.
 ) every 0.3 seconds, or 290MB/s if we save the data as 32 bit floating data. If we however save it as jpeg data, we can compress it 5-15 fold bringing down the required read bandwidth to about 30MB/s. If we look at hard drive speeds we typically see speeds of 100-150MB/s, so this will be sufficient for data compressed as jpeg. Similarly, one is able to use mp3 or other compression techniques for sound files, but for other data sets that deal with raw 32 bit floating point data it is not possible to compress data so well: We can compress 32 bit floating point data by only 10-15%. So if you have large 32 bit data sets, then you will definitely need a SSD, as hard drives with a speed of 100-150 MB/s will be too slow to keep up with your GPU – so if you work with such data get a SSD, otherwise a hard drive will be fine.


")
")
")